How to use Google Gmail’s 2-step authentication/Verification
Since past few days, I was noting “Use 2 step authentication” link in my Google account. I wanted to check the features, but wasn’t able to do that due to my schedule. Finally, yesterday, I spared time for Gmail’s 2-step authentication/verification, checked all the features and also implemented it for my account. Gmail’s 2-step authentication is one of the best login security measures on web and I highly recommend you to enable this feature for your Google accounts too. I have provided all the details about Gmail’s 2-step authentication in the article below.

 It was Facebook who really impressed all by integrating “Geolocation check” as a security measure. Now, Google has gone a step further. Whenever you try to login to your Gmail account, you have to first enter the Gmail username and password which we do even now. But, after hitting on Login, you wont be taken to your Inbox. Gmail will send a verification code to your mobile phone via text or voice message and you will have to enter this verification code to authenticate yourself. After completing this step successfully, you will be given access to your Gmail account.
No doubt, Phishers, Keyloggers and Stealers have proved to be useless due to introduction of this 2-step authentication feature.
2. Select and enter your phone number where you want to receive the verification code. You need to verify this number.

So friends, this was all about securing your Google Gmail accounts using 2-step authentication. I have enabled this feature for my account too and it is working perfect for me.
Got any problem in using Gmail’s 2-step authentication??? Please share it with us in comments.

Gmail’s 2-step authentication:
Previously, there was a lot of discussion about this “Multi-stepped authentication”, in which Image Password was considered as a part. But, Google proved all the discussion false by implementing Phone verification code as the second authentication step. So, even if hacker knows your Gmail password, he wont be able to login to your Gmail account due to this 2-step authentication feature.
No doubt, Phishers, Keyloggers and Stealers have proved to be useless due to introduction of this 2-step authentication feature.
How to enable 2-step authentication:
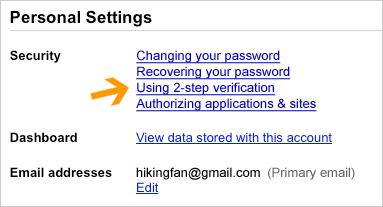
1. Login to your Google account settings page. You will see a link “Using 2-step authentication”. Use this link and on the next page, click on “Set up 2-step authentication”.2. Select and enter your phone number where you want to receive the verification code. You need to verify this number.

Note: Make sure you use your own number as misuse of this number can compromise your Gmail security.
3. After verification, move to next step where you will be given Verification codes which can help you to login to your account if you are away from your phone.
Note: Save these Verification codes to a safe place. Make sure that no stranger is able to access them.
4. On saving these verification codes, you will be asked to enter another phone number which serves as the third method to access account i.e. if your first phone is stolen and you don’t have verification codes, too. Enter this phone number. Hit on Next twice and click “Turn on 2-step verification”
Now, your Google account is secured.
Note: Some of the applications will ask you for password after enabling this feature. This has to be entered only once and you can easily generate application specific passwords.
So friends, this was all about securing your Google Gmail accounts using 2-step authentication. I have enabled this feature for my account too and it is working perfect for me.
Got any problem in using Gmail’s 2-step authentication??? Please share it with us in comments.


0 comments:
Post a Comment